(Updated for 2.01 firmware)

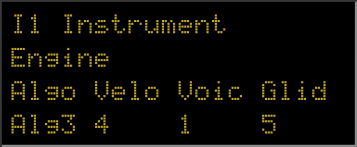
- Line 1: you can read from left to right : instrument number, instrument name, midi note on activity for all 4 instruments on the right.
- Line 2 & 3: information on what you currently edit.
- Line 4: the values of the 4 parameters.
- The Engine (Algo, voices, modulation indexes, mixer). At any moment, hold ‘Eng’ and press ‘Menu’ to see the current algorithm configuration.
- The 6 operators (or 3 or 4 depending on the algo)
- Navigate through the oscillator and the 2 envelope menus of the operator selected in 2.
- The 12 rows Modulation Matrix
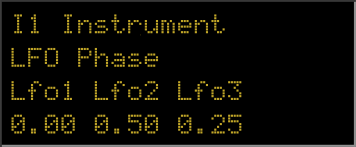
- The 7 LFOs (3 oscillators LFO, 2 envelopes and 2 step sequencers )
- Performance mode : allows you quickly edit the parameters p1, p2, p3, p4 if you use them as source in the Matrix. Accessed by pressing (5) & (7) at the same time or pressing one of the encoders (8) with last PCBs.
- (1), (2), (3), (4) or (5) : navigate quickly inside a part
- (6) modify value 10 times faster.
- (7) reset the parameter to its default value
- Inst (6) + one of the 5 left buttons. Tests note, play sound of the current instrument.

- Inst (6) + Menu (7): Panic. Stop all sound, useful if you have hanging notes.
![]()
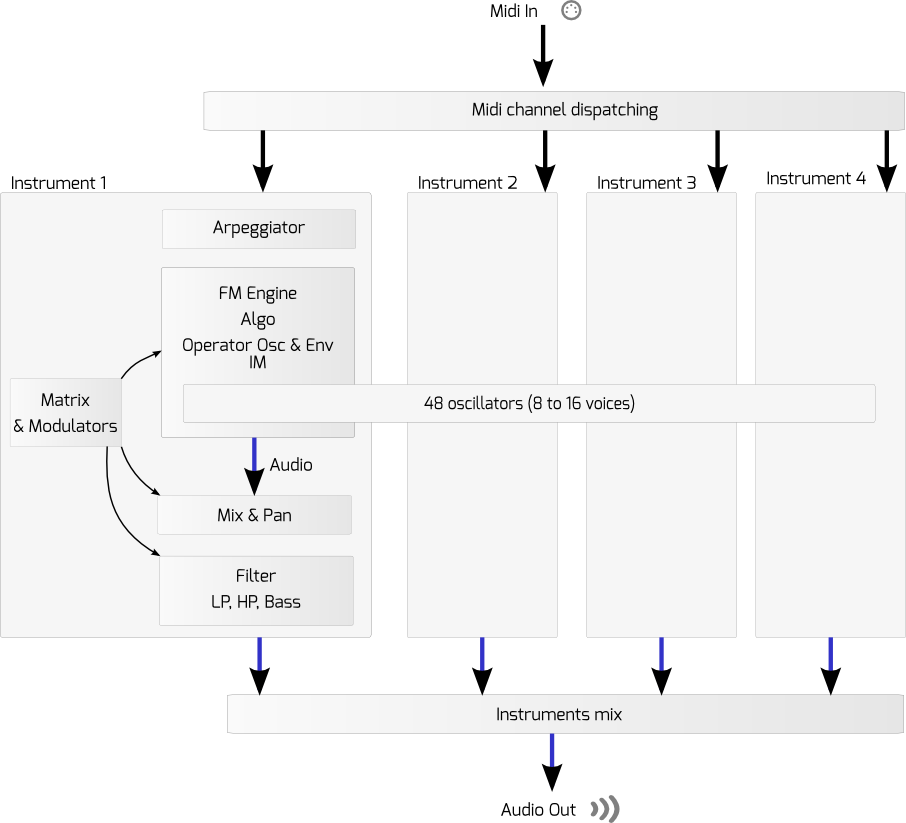
Workflow of the PreenFM2 sound generation
![]()
1 – Engine
Algo :
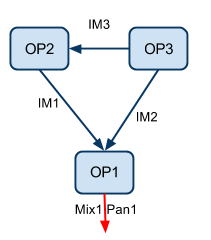
This define the way the operators are plugged with each other.
The backbone of your sound.
27 totally different FM algorithms are implemented.
Here is the first one, which is good to understand how things work.
See the algo page for an exhaustive list.
Changing the algorithm make it shows up on the LCD. You can press « Eng » + « Menu » to see it at any moment without changing the algo.
Velo (1-16) :
1 The keyboard velocity has no impact on the volume of the voices. Volume always full.
..
16 Full impact of the velocity on the volume of the voices.
The velocity source in the matrix modulation is independant from this setting.
Voices :
Number of notes that can be played at the same time by this instrument.
What the engine can handle depends on the number of operators of the algo of the 4 instruments.
Knowing that 48 operators can be played real time that means that maximum value of voices is :
. 14 voices for 3 operators algorithm
. 12 voices for 4 operators algorithm
. 8 voices for 6 operators algorithm
The 48 operators are shared by the 4 instruments.
Glide :
When the number of voices is set to 1, the glide param shows up.
When higher than 0, the env is not retrigged when a new note is played before the older one is released.
0 : no glide
1 : very quick frequency glide
..
10 : slow frequency glide
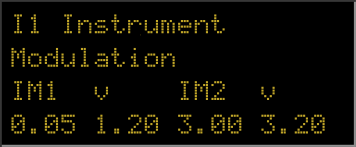
Depending on the algo selected in the main engine screen, IM1, IM2, IM3, IM4 or IM5 shows up.
This is the direct value of modulation index as describe in all the FM documentation.
This is the heart of the FM engine and the more important parameters of the PreenFM. And the first one you’ll want to target from the modulation matrix.
v is the amount of modulation that is injected by the velocity of the note you pressed.
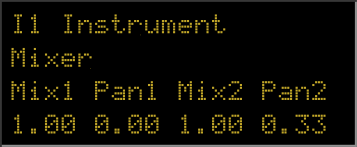
If you continue pressing the ENG button you’ll reach the mixing parameters. Each of the carrier operator has its Mix and Pan parameter.
It’s interesting to play with the Pan parameter in the modulation matrix.
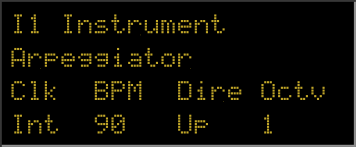
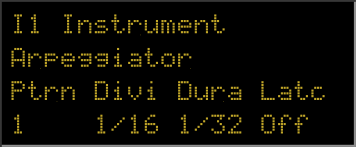
Arpeggiator
There are 22 pre-programmed patterns. After pattern 22 you’ll find 4 user patterns : Usr1, Usr2, Usr3, Usr4.
If you select one of latter, an aditionnal page will show up when you press the ENG button. The Pattern editor :
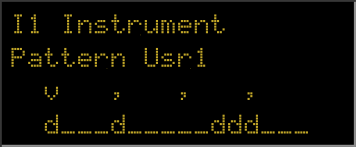
Use the left encoder to move the cursor and the 3 other encoders to activate or desactivate the triggers.
The encoder 4 will (de)activate the trigger just bellow the cursor. The encoder 3 will do 4 triggers at the same time separated by 1 beat. And the encoder 2 will (de)activate all triggers of the current beat.
Filter slot
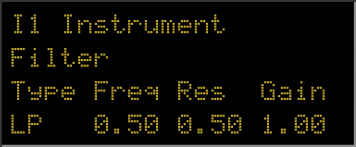
The available filters are (in firmware 1.04) : Low pass 2nd order, High pass, Bass boost, Band Pass and crusher.
The Filter cutoff frequency and the crusher sampling rate can be modified by the modulation matrix.
2 – Operator
User Op button to select your Operator number and the button just bellow to select « Oscillator », « Env A » or « Env B ». A different behavior can be selected in the settings.
Depending on the algo you’ve selected, you can have between 3 and 6 operators.
The operator number you’re currently editing always show up on the lcd. 3 in the above screen.
You can trying to edit only with your ear but it’s always good to have in mind the algo picture so that you can understand how the knob you turn will modify the sound.
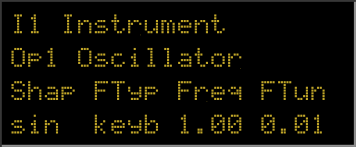
Shape :
This defines the waveform that the oscillator is using. Pure FM snthesis only use sin waveform.
PreenFM proposes you several waveofms, and even a noise (rand) waveform very usefull to create percussive attack or to add noise/breath to your sound.
You can chose for each operator independently between sin, saw, square, noise and 3 sinus variations.
User waveform : In firmware 2.01 have been added the user waveforms feature.
You have 6 aditional waveforms that are read from the preenfm2 usb drive.
Put you own waveform in /pfm2/waveform/ of the preenfm2 usb drive.
They must be called usr1.txt, usr2.txt… usr6.txt
Format is simple :
<4 chars for name>
<number of samples>
<sampe1> <sampe2> <sampe3> ….
Samples must be float values between -1 and 1 with a « . » as decimal separator.
Samples can be separated by what you want : tab, space, comma, return….
See message here for user waveform examples and here to turn wav files into preenfm2 format.
The preenfm2 will create a usr*.bin from your txt to read the waveform faster and so boot faster.
If you modify your waveform you have to remove the bin so that it’s recreated.
The waveforms can be found in « Operator>Shap » after « Off ».
FType:
Keyb : the frequency of the oscillator depends on the key you pressed and on the 2 following params : Freq and FTun.
Fixe : the frequencry of the oscillator is always the same. The 2 following params allow to change this frequency. In this case the LCD will show you the frequency that the oscillator will produce in Hz.
Freq:
IF Ftype i set to « Keyb », the this param is the ratio between the real note asked by the key you pressed and the frequency the oscillator will produce.
1.0 : real frequency
1.5 : a fifth above.
2.0 : An octave above
3.0 : An octave and a fifth above
4.0 : two octave above
etc…
If FType is set to « fix », the frequency of the oscillator won’t depend on the key you press, you can then change this frequency with button 3 and 4.
Ftun:
Fine tune… Small adjusment to the main frequency.
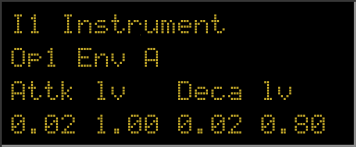
The envelope of each operator has 8 parameters, copied from the DX7 enveloppe.

You still get the usual Attk, Decay, Sustain release. The first parameter set the time this state lasts. And the second parameter « lv » (level) the value that must be reached at the end of this state.
When a note off is sent, the enveloppe jumps to the Release level.
For the carrier operator you should avoid having the Release level different from null.
3 – Modulation Matrix
Each instruments has 12 matrix rows to modulate its parameter.
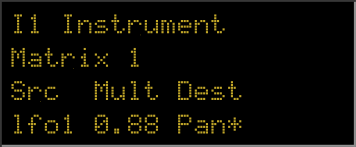
Each row has the usual 3 parameters : source, multiplicator and destination.
As source parameter you can choose between the 7 Lfos (see next part), modulation wheel, pitch bend, after touch, velocity, 2 values based on key note (Not1, Not2 : see LFO 4.4 for more info), and 4 performance parameters.
The multiplicator’s range is -10 to 10.
4 – Modulators
Each of the 4 instruments in the PreenFM2 can use 7 low frequency modulators.
- 3 LFO
- 1 free enveloppe
- 1 free enveloppe with loop and silence (LFO Env 2)
- 2 step sequencers.
The role of these 7 LF modulators is to be set as source in the matrix rows.
4.1 LFO

Shape :
The waveform of the LFO.
You have the choice between 5 possibilities : sinusoid, sawtooth (up then down then up…), ramp up (up then go to begining then up…), square (max value then min value then max value….) and random values.
4.2 Free Enveloppe 1
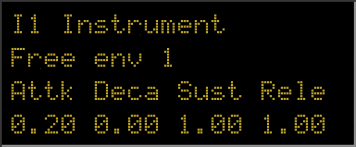
The 4 standard ADSR enveloppe parameters. All values are in seconds.
Nice on filter cutoff frequency.
4.2 Free Enveloppe 2
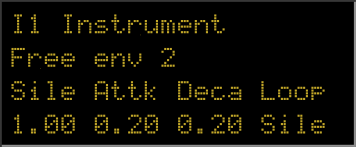
Silence, attack, decay and Loop.
After the decay the Loop parameter allow you to loop back to the begining of the silence, to the begining of the attack or not to loop at all.
Silence values can be targeted from the modulation matrix. Random LFO can nicely modify the silence time to make an organic/alive enveloppe.
4.3 2 step sequencers
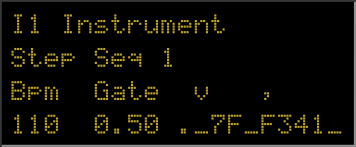
The step sequencer output can be routed in the matrix modulation to any available destinations : « mix* » to give punch to one of your carrier operators, « IM* » to shape the spectrum in rythm or « o*FR » to write a melodic line.
In this latter case, set the matrix multiplier to 10.0 and you’ll get one step sequencer value per semi-tone: 0, 3, 7, C for minor chords.
4.4 Note Midi Scaling
As written in the matrix part, you can modulate your destination parameters by 2 values based on midi note values (0-127).
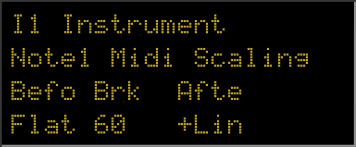
Those 2 « note midi scaling » pages allow you to fine tune the value you want depending on the midi key note entry.
You can select the break note (or middle note) then 2 curve that starts from this point in both direction.
Before and After describe the kind of curve you want the respond to follow :
Flat: 0 for any note
+Lin : 1 per step from the break note value.
+Lin8 : 8 per step from the break note values
+Exp : exponential curve, starts slowly and go up faster as you go further from the break note.
-Lin, -Lin8, -Exp : same as the 3 above but with a negative value.
Simple use case example :
Stereo panning over the keyboard. Low note on the left, high note on the right : (-Lin, 60, +Lin) that you multiply by Pan* in the modulation matrix.
Decrease the IM for high notes to get rid of aliasing. ( Flat, 60, -lin8) that you multiply by IM* in the modulation matrix .
5 – Performance
The performance page show up when you press one of the encoder or both MOD&MENU if you don’t have clickable encoders.

This page’s goal is to allow you to control from one page the important parameters of you preset.
p1, p2, p3, p4 have to be specified in the modulation matrix and can be used in 1 or more matrix rows.